3. App overview
introduces the main features, functionality, and interface of the software, providing a general understanding of its capabilities and usage.
- Home Screen
- Space Overview
- Quick Access Panel
- Dashboard
- Providers
- Space Settings
- Interior Editor
- Account
Home Screen
When you launch SIM-ON, you start in the Space Browser view, which is your Home Screen, it includes the following:
- My Spaces
Explore all the spaces you have access to, from this organized section
- News
Catch up on the latest from SIM-ON, SIMLAB, and the ever-evolving world of IoT

To access the Home screen at any point while working on a SIM-ON space, select the Browse Spaces located in the Side Panel menu
In the Home Screen you will find the following buttons:

Select this button to create new project space Account:
Opens a roll-out quick access menu of your Account Full screen:
Toggles between full screen and windowed view
Space Overview
Quick overview of the Project Viewport.
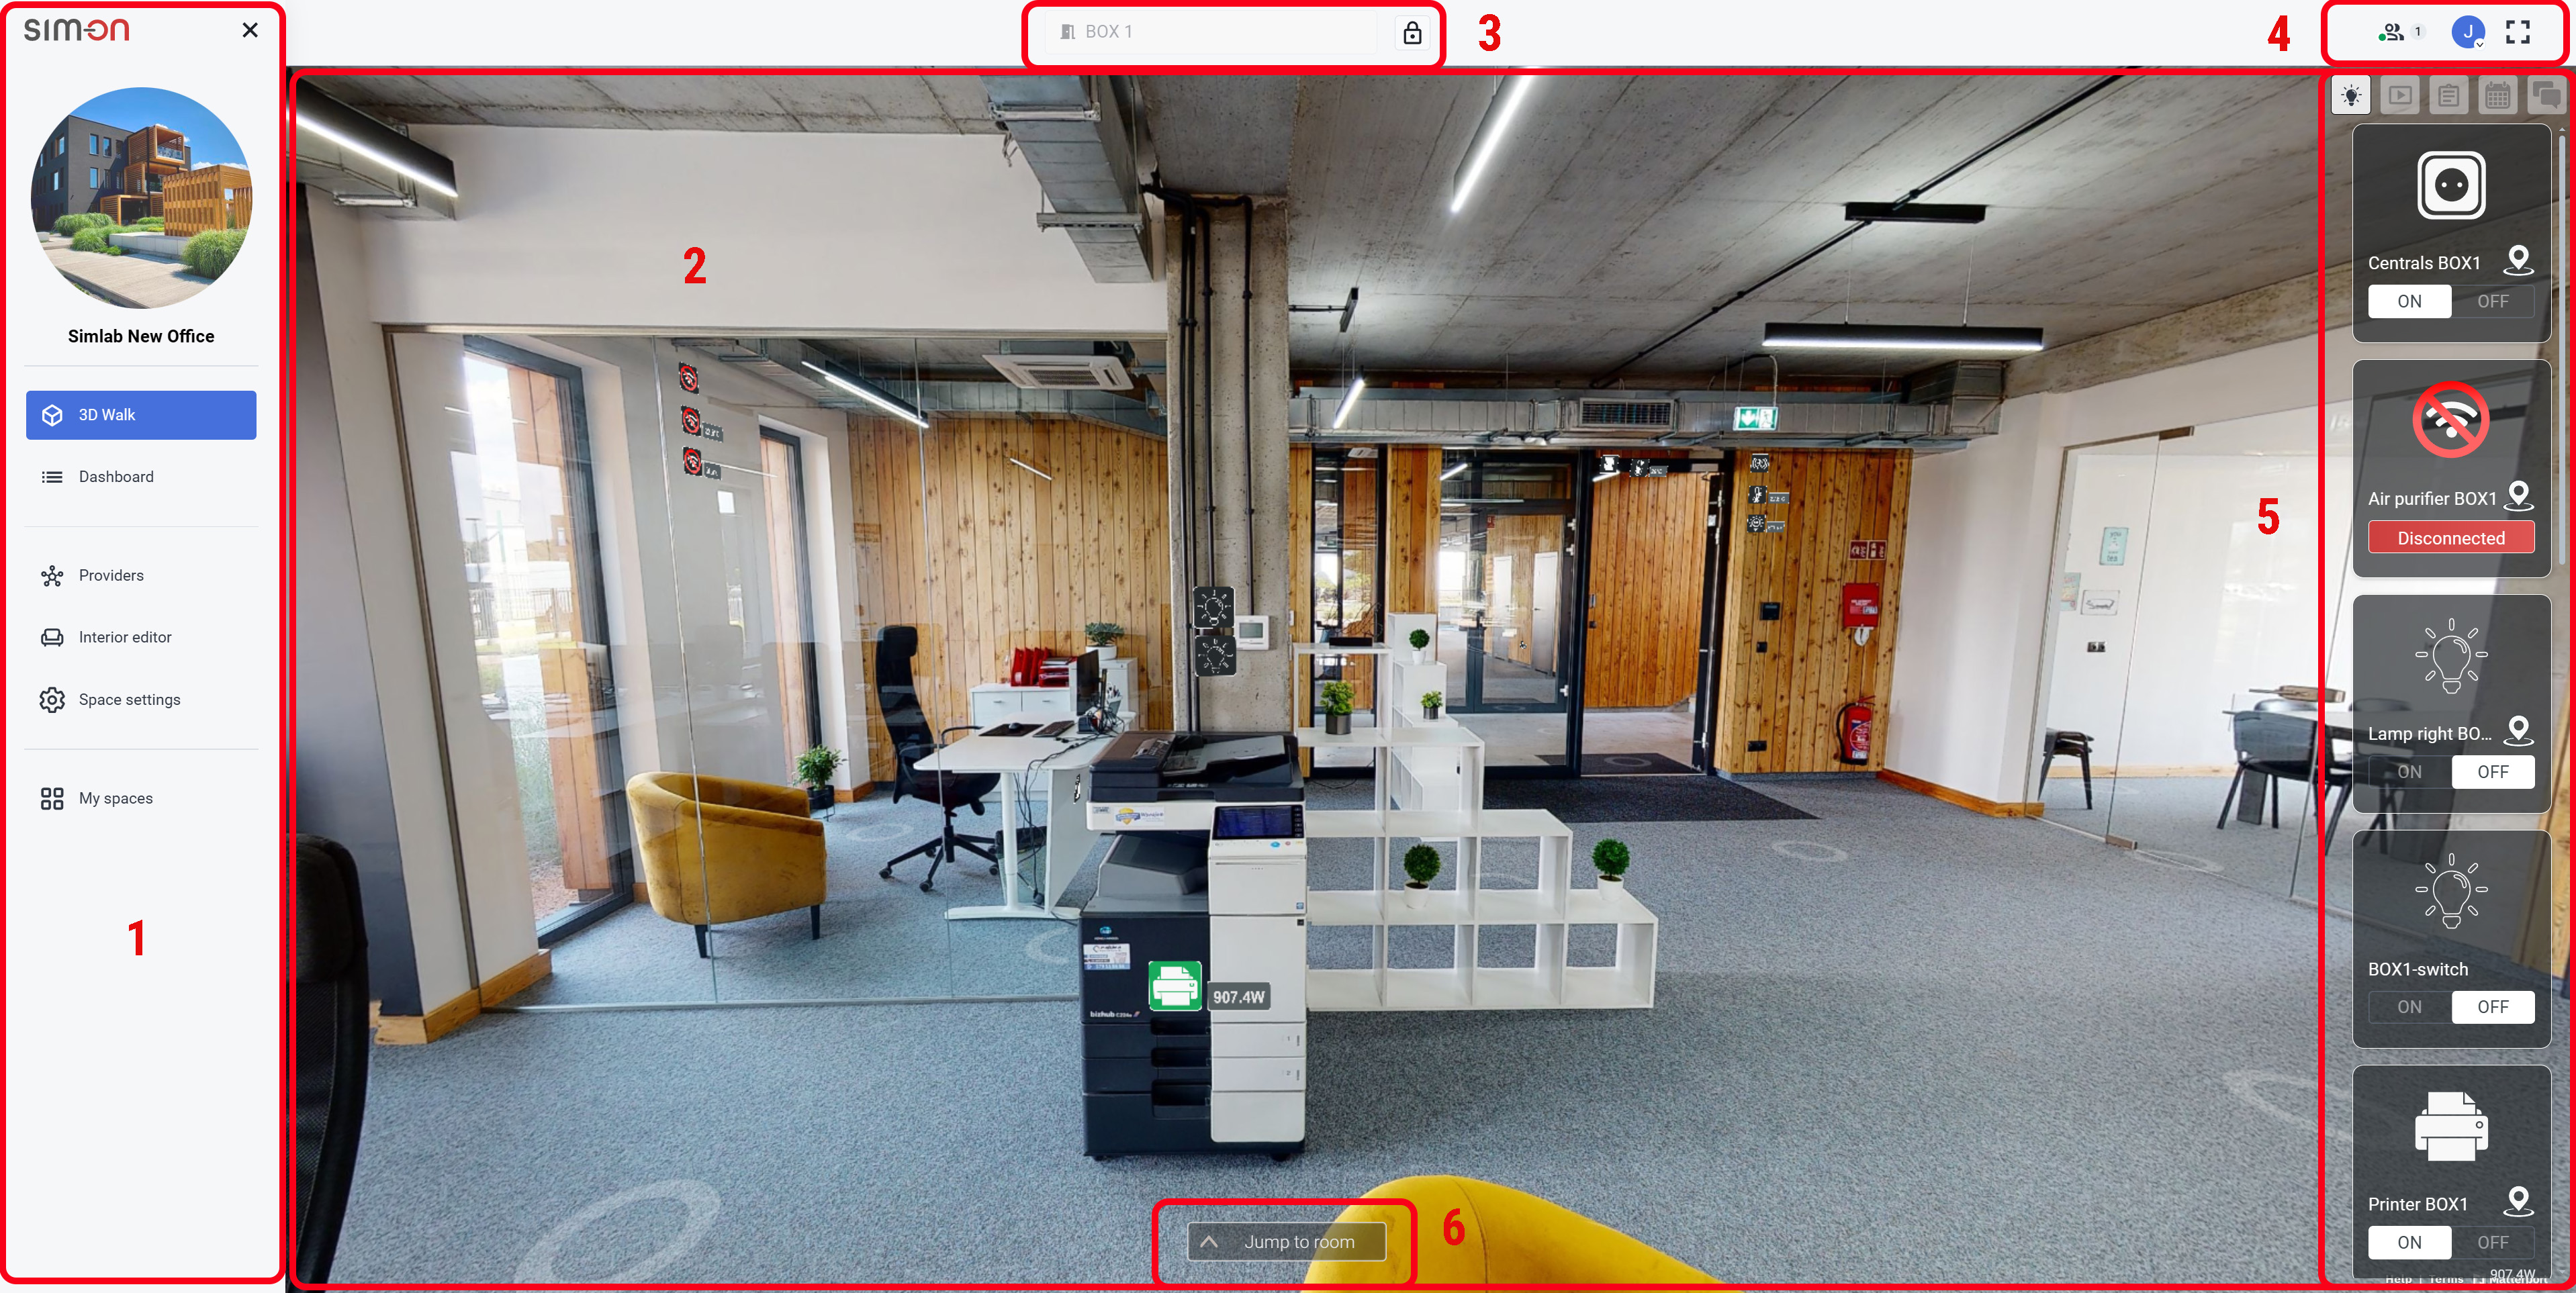
- Left Side Menu panel
- Viewport
- Active Space (Current Room)
- Currently Active users / User Account / fullscreen toggle
- Right side Quick panel
- Room quick access
- At the top left corner there is the burger menu
 that rolls out the Side Panel.
 - Just under it, is located the interior editor
 toggle.
If you've added any 3D assets to your scene, you will be able toggle their visibility. This will change the icon.
 - In the top central part you can see the the current active space, next to it is the
 lock icon. To edit the space you need to first unlock the space editing. You can do it by "unlocking" the
  lock icon by clicking it.
 - Since the 3D View of the app uses the Matterport Virtual Tour, all the regular Matterport 3D space features are available from the bottom left corner of the viewport.
Side panel
The left side panel is the main menu of the app, from which all other views and features are accessible from. These are as follows:
3D Walk


The Matterport-supported virtual tour view of the app. It is the central, main view of
the app, used to manage and showcase the space. From here you can:
- Move around in the virtual space
- Setup rooms for swipes
- Use Quick Access Panel for various in-app operations
- Place devices within the 3D space
And many more.
To learn about all the features of the app, go through the following pages
Dashboard
![]()
Setup, edit and manage all of the Devices, Assets and Scenes within the project.
See Dashboard chapter for detailed feature and functionality description
Providers
![]()
Manage your Smarthome providers. Add/remove the Hubs to the project, manage connected devices and their status.
See Providers chapter for detailed feature and functionality description
Interior Editor

Place 3D models within the virtual space of the project to explore the possible arrangements for your space, using our model library.
See Interior Editor page for detailed feature and functionality description
Space Settings
![]()
General project management view, mainly used by project managers to handle: users, user roles and the activities within the project.
Additionally: basic project information and Room manager can be accessed from here.
See Space Settings chapter for detailed feature and functionality description
My spaces
Return to the Home screen of the app. See the available Spaces and News.
Quick Access Panel
![]()
Used in tandem while in 3D Walk to access the features of the app for smooth user experience in managing:
- Devices
- Scenes
- Assets
- Events
- Tickets
See Quick Access Panel page for detailed feature and functionality description
Quick Access Panel
DevicesIf there are connected devices, you will see a list containing all of them. You can interact with them by clicking their thumbnails.
Depending on the Device type there will be different information, status and icon for the device, as well as various options
To find the device's location, click on the pin |
|

Scenes
Quick access to all of the scenes in the Dashboard.
|
In the Scenes tab you can manage the devices scenario for the whole room/area. After adding a scenario, you’ll have access to play the scene or change its options (name, icon, trigger, scene construction).
To play the scene, click on the button/icon and the status will change. |
 |

Assets
Asset tool provides a comprehensive repository for all data related to the components and equipment of a property. Users can place Asset icons within a 3D space tour, each linking to a detailed database that includes text descriptions, active links, images, documents, and YouTube videos. It also allows users to link events directly to the property maintenance schedule.

Clicking on an Assets tab - you will see the Asset List displaying available assets within project. Clicking on Asset Tile or Asset Icon in the list within 3D space will open with model details will pop up. On the details window you can locate the asset, add media or visit the dashboard.
|
Asset list
|
Asset Panel
|


You can also add another asset from here - hover over ![]() icon, located at the bottom right of the asset list (if there are a lot of assets you'll have to scroll down the asset list to find it) to reveal
icon, located at the bottom right of the asset list (if there are a lot of assets you'll have to scroll down the asset list to find it) to reveal ![]() button.
button.
The Asset Panel will appear:

To Create an Asset, all fields marked with a red asterisk * need to be filled. You can add multiple photos, videos, documents or create events with your asset, as seen in the prior screenshot.
When you're done, click the ![]() button to finalize asset creation. From now on your Asset will be visible in the Asset List and in 3D view (if you assigned it a position.)
button to finalize asset creation. From now on your Asset will be visible in the Asset List and in 3D view (if you assigned it a position.)
Maximo Links
If there is currently added IBM Maximo provider to the scene, Simon Assets will have an additional option of linking with Maximo Assets, as seen in the image below, an additional option field appears at the bottom of the asset stack, under Events:

To Learn more about IBM Maximo integration, see: adding IBM Maximo to the Scene and additional Resources view.
Events
Access to the event timeline showing incoming events.
|
Events feature lets you track and manage different events happening in your home.
1. Event Timeline:
2. Search:
3. Edit Events:
|
|


Tickets
In the Ticket tabs you can find comments added in the project. You can create a new one or edit an existing one.
To manage a detailed list of the tickets, see Tickets page in Dashboard
|
Tickets list
|
|
Detailed view
|


Reporting Problems
- If something isn’t working, like a light or thermostat, you can report it through the system’s app or interface.
Maintenance Requests
- You can create tickets for routine tasks, like changing air filters or checking battery levels.
- The system might allow to connect with service providers to create tickets for them for fixing or maintenance.
New Ideas
- If you have an idea for a new feature, you can suggest it by creating a ticket.
- Voting: Others can vote on your suggestion, helping the team decide what to work on next.
Support and Troubleshooting
- If you need support, you can create a ticket and track its progress.
- The ticket can be connected to a specialist, making it easier to get help when you need it.
Dashboard
Central hub for all the devices, assets and scenes, sorted by rooms.
Devices
In the Devices view you can see all the devices in the selected rooms or all devices in the project if All Rooms option is selected.
Device List
|
|

Device Details
| After clicking on one of the devices, you will see the device details. By clicking the pin |
|

Device Settings
|
By clicking settings
and visibility in the 3D view. |
 |
Device Structure
|
You can also see a device structure - it varies for different devices - there can be a few devices connected to one master device, or just one. It depends on the provider's hub structure and you can decide which elements should be visible in the 3D view. |
 |
Assets
An asset is a physical object (that lacks smart connectivity) you, as a user, wish to keep track of in the SIM-ON project space. For example assets, see the screenshot below.
In the Assets view you can see all the assets in the selected rooms or all Assets in the project if All Rooms option is selected.

|
|
 Filters
Selecting an asset tile will reveal it's details. Press "Edit asset" to manage the asset information and files uploaded to it.
 |
 |
IBM Maximo
If you have a connected Maximo provider to your space, you gain an additional feature within Assets to link them with Maximo assets:

|
Adding from existing lets you add a link that you might have added before in the Resources page. This will reveal a similar Maximo Links list for you to choose from:
|
Selecting "Add new" will open the following Maximo List to add new link from. |
 When asset is not linked with Maximo, you will see the following options:
Scenes
Automate the Devices behavior with various triggers and states within the project.
Scene view

In the Scene view you can see all the scenes available. Scenes can manage different scenarios including turning on the lights on, planning to turn on or off different devices depending on the various triggers. Additionally you can add new scenes from here as well or delete the existing ones.
To delete or edit a scene, click the more options ![]() button on the scene tile.
button on the scene tile.
You need to have appropriate permissions to edit Scenes.
Scene editor

To add a new scene, click the ![]() button. This will invoke the Scene editor view. You need to provide a name, icon, select scene trigger and create scene construction and then save it.
button. This will invoke the Scene editor view. You need to provide a name, icon, select scene trigger and create scene construction and then save it.
Tickets
Create, manage and assign tickets for other space users.

The Tickets view in the Dashboard is a detailed Ticket management view for the project, where you can see the status of every ticket together with other necessary information such as:
- Due date
- Ticket Stakeholder
- Last edit time
From here, you can easily go to the location of the ticket, through location ![]() button located at the end of the ticket tile.
button located at the end of the ticket tile.
Ticket Creation


The ticket creation system can be used in following situations:
Reporting Problems
- If something isn’t working, like a light or thermostat, you can report it through the system’s app or interface.
Maintenance Requests
- You can create tickets for routine tasks, like changing air filters or checking battery levels.
- The system might allow to connect with service providers to create tickets for them for fixing or maintenance.
New Ideas
- If you have an idea for a new feature, you can suggest it by creating a ticket.
- Voting: Others can vote on your suggestion, helping the team decide what to work on next.
Support and Troubleshooting
- If you need support, you can create a ticket and track its progress.
- The ticket can be connected to a specialist, making it easier to get help when you need it.
To edit a ticket, click on the more options ![]() button located at the end of the Ticket tile.
button located at the end of the Ticket tile.
This will open a new window with following options:

Filter, Sort and Search

![]()
The ticket management functions are fitted with comprehensive filter, sort and search functionality. Handle large amounts of tickets by:
- status
- date
- assignee
- creation time
- name
Resources*
This View is specific only to IBM Maximo provider. See how to connect an IBM Maximo provider
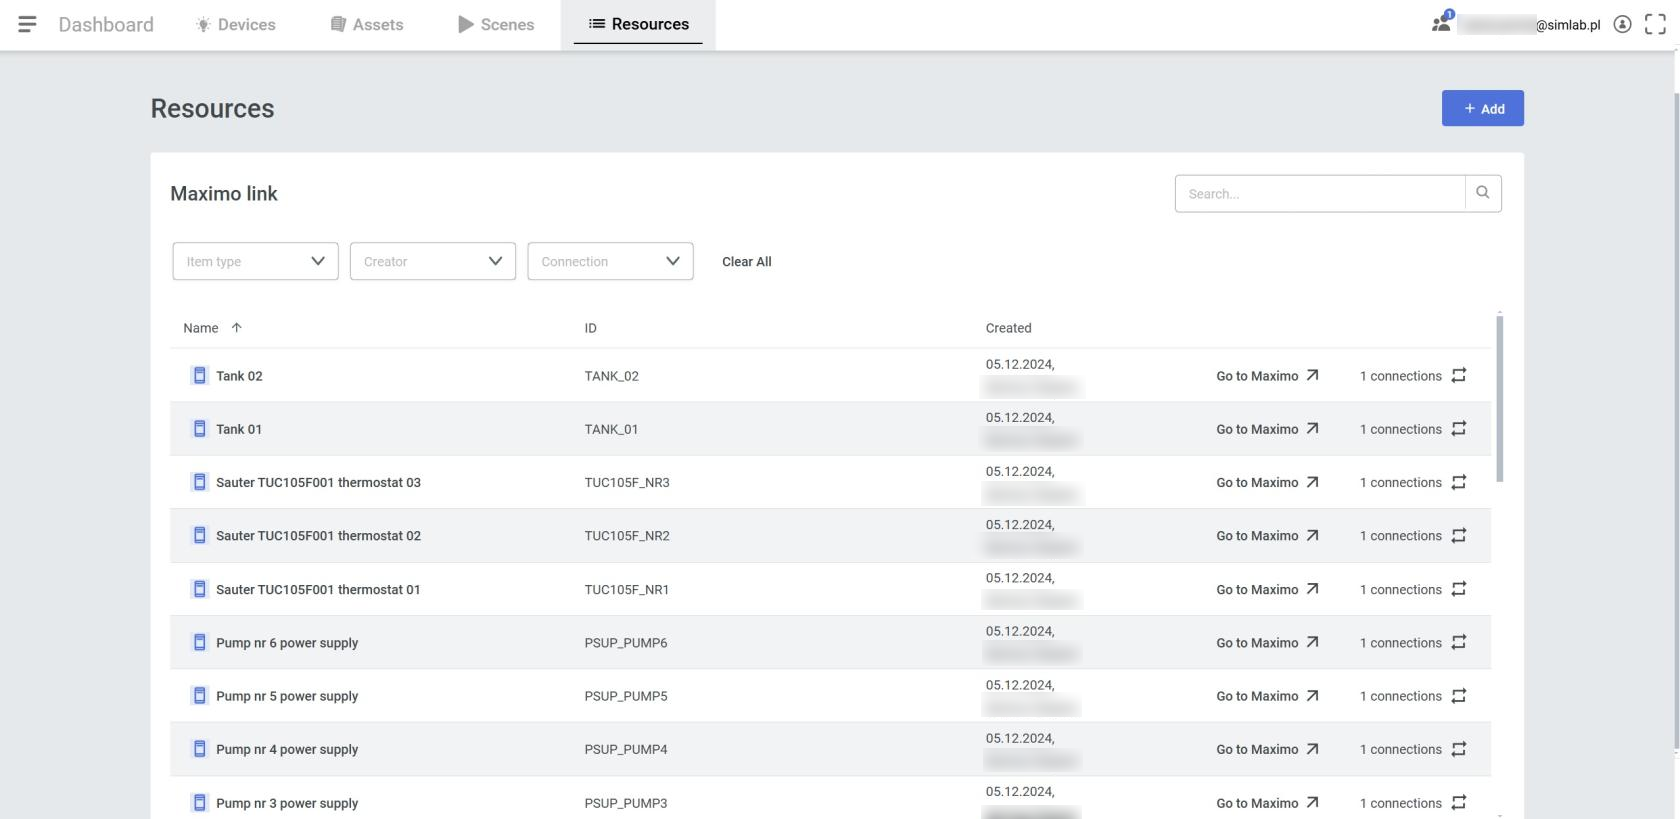
Manage Maximo links, and asset connections
Inspecting a Maximo item shows currently linked assets, together with a quick access to their location. Additionally, we can go directly to the linked item in the Maximo site.

Adding Maximo Link
From this panel you can also "pre-add" Maximo items for easier linking/management in the future. Press the " + Add " button
With the revealed panel, we must choose the Maximo system we want to list items from and select the desired one. The name of an item can be changed for the Simon side, but it's not necessary, as it will inherit the name by default.
Providers
Providers settings lets you monitor the status of the provider devices and manage them.
Connections
The Connections tab displays all the 3rd party HUBs that are currently connected to your space. From this view you can add or remove HUB connections.
|
|
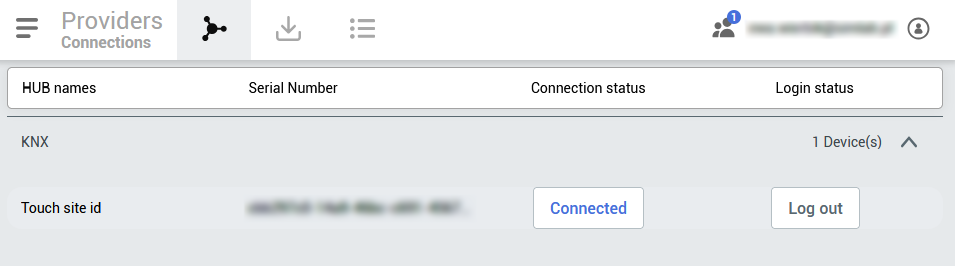 |
The connected HUBs listed here will be automatically sorted to corresponding families they belong to. HUB names will be displayed here together with serial numbers of the HUB. Additionally you can check whether the HUB is currently online and toggle its status manually.
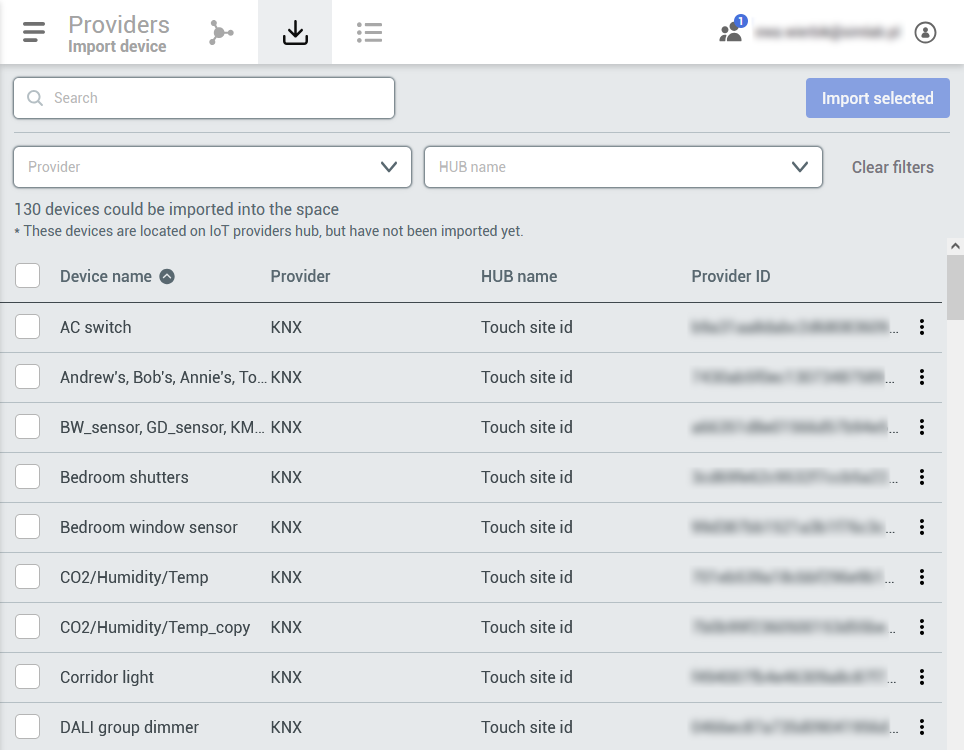
Import device
In this tab will be displayed all the devices from the Connected HUBs that are not yet imported to the SIMON device list. Here you will be able to search and filter the devices by provider, hub and name. To further locate the desired device
|
|
 |
Device list

All the linked devices will be available here. From this tab you’ll be able to check the status of the device, which HUB it belongs to, the Provider family and assigned room of the device.
Space Settings
Space Settings allow you to manage your spaces.
General info
In the General info tab you can see the most basic information about your space, such as address, cloud space limit usage, space components and space owner.
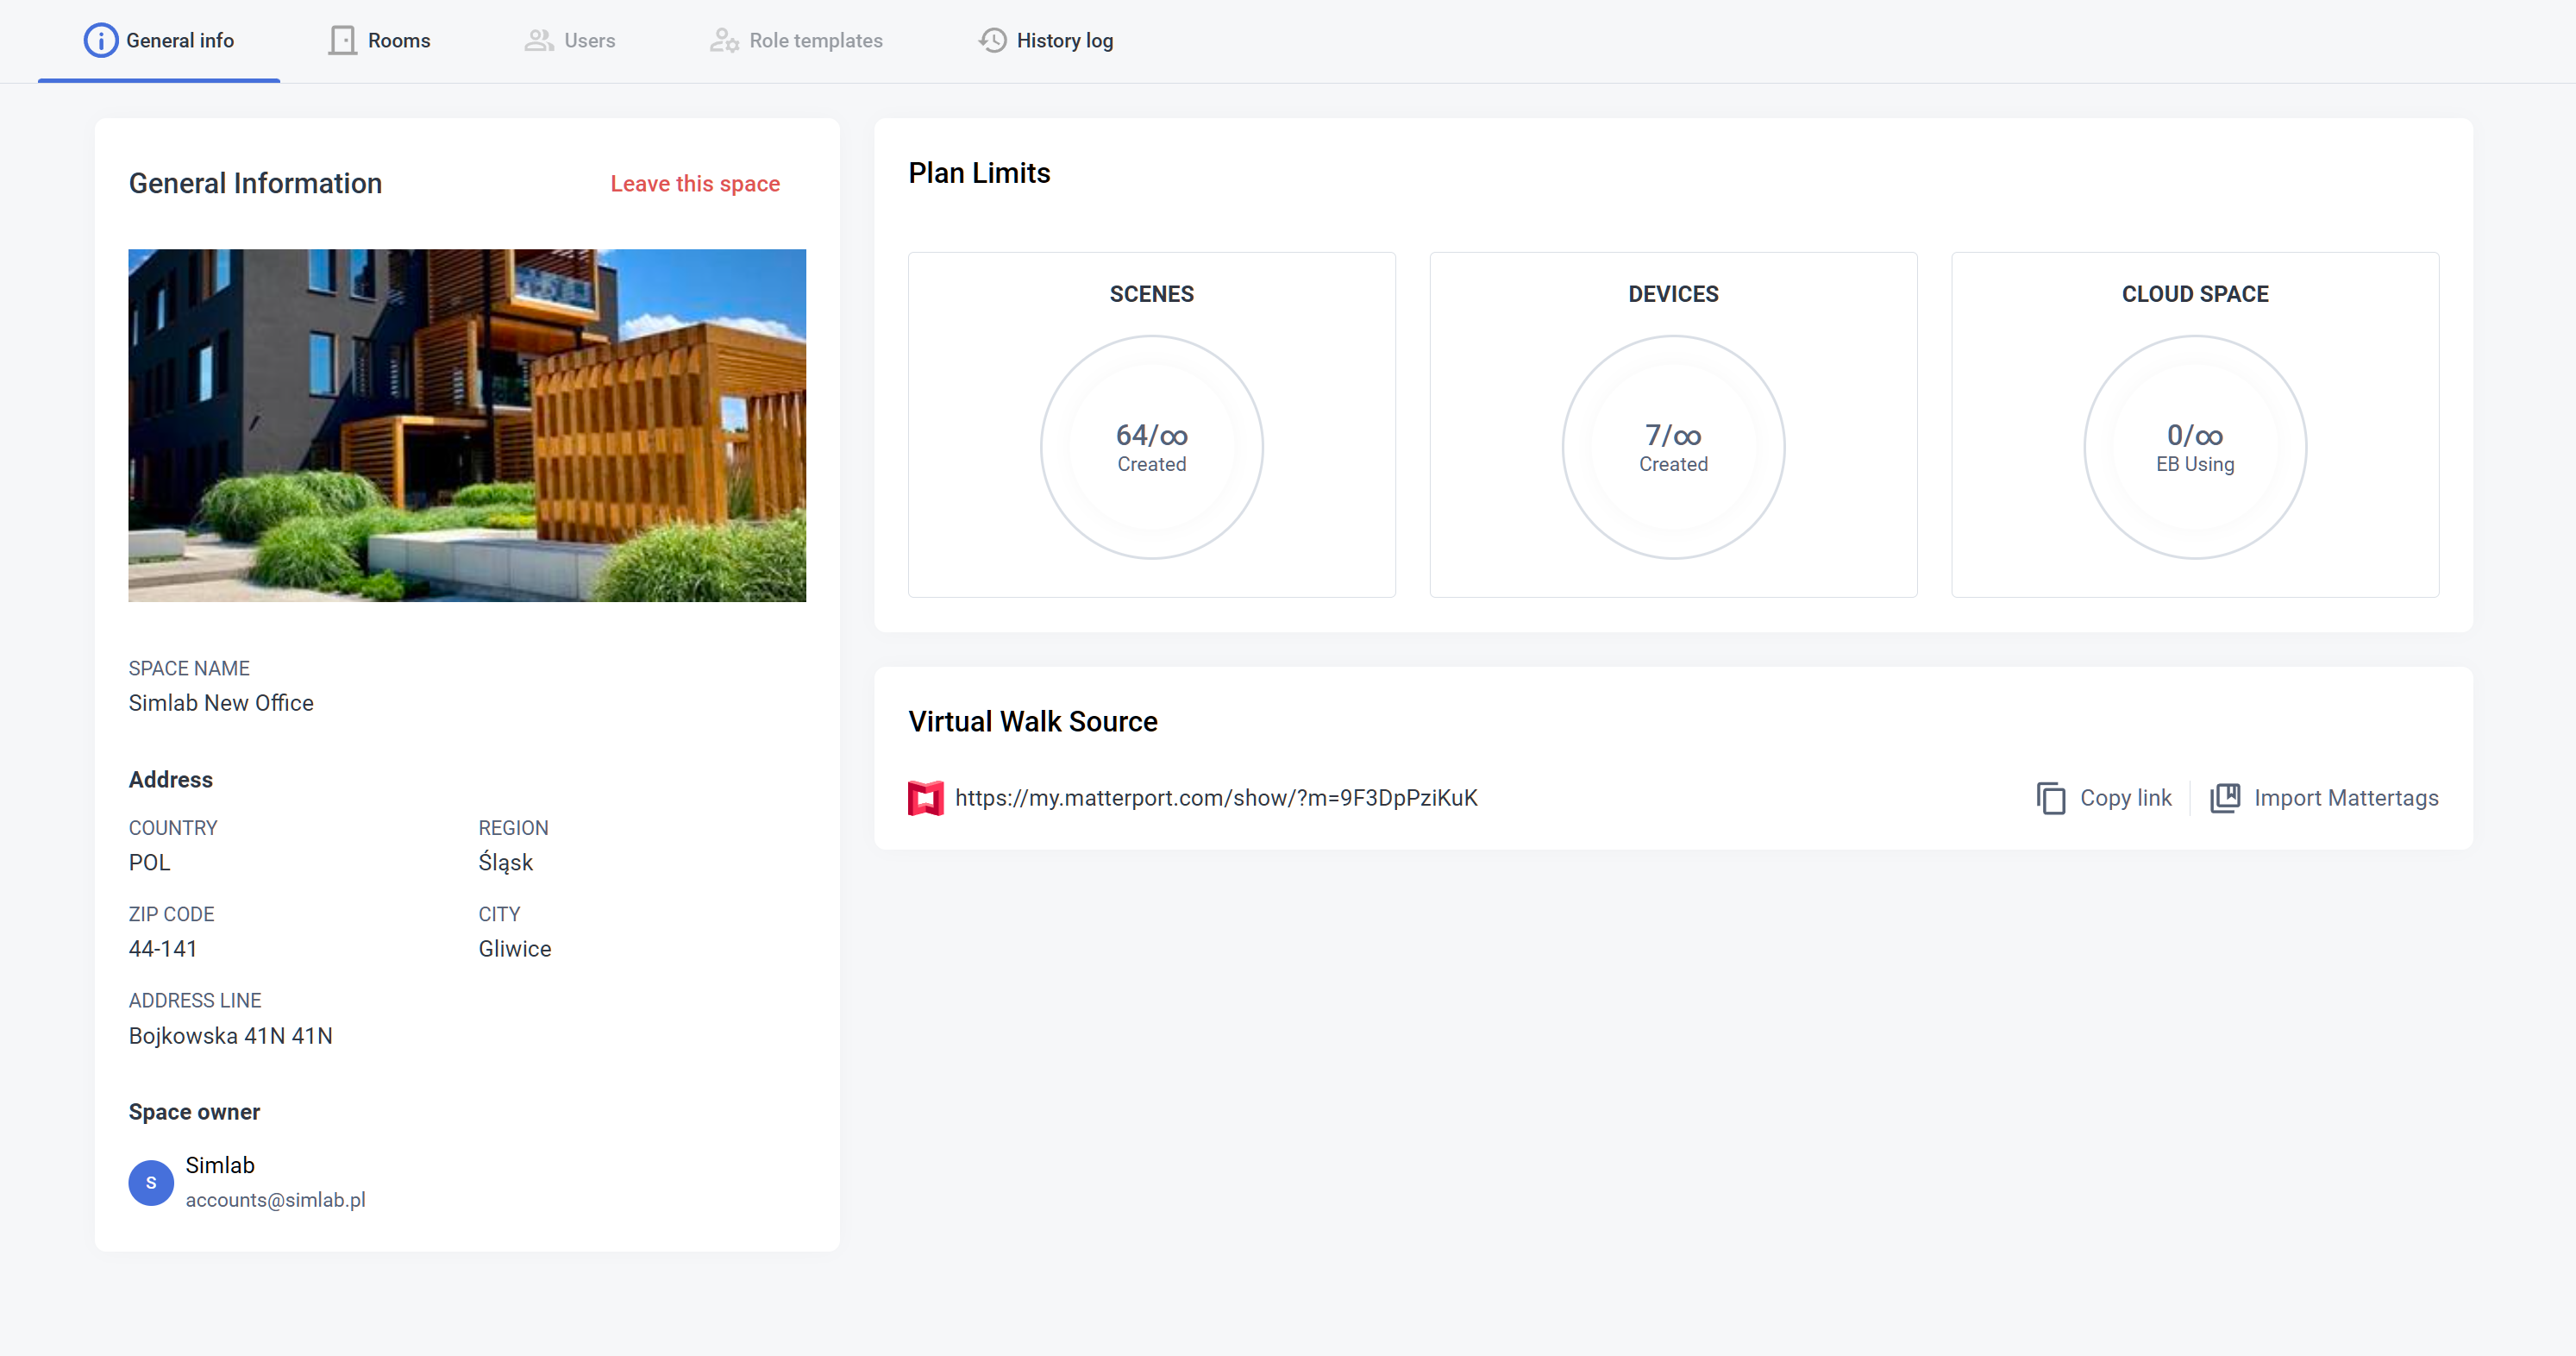
- General Information
Check your space basic information: name, street, house number, apartment number, town, region, zip code and country, space owner. You can also Leave the space from here.
With appropriate permissions you can Edit General info from here as well as delete the space itself
- Plan Limits
Check your scene limits usage: you can see how many devices and scenes you used in your project as well as how much cloud space is being used.
Remember that the cloud space limit usage depends on the subscription plan and might vary from the information above
- Virtual Walk Source
In here you can change the link to your Matterport Virtual Tour Scan.
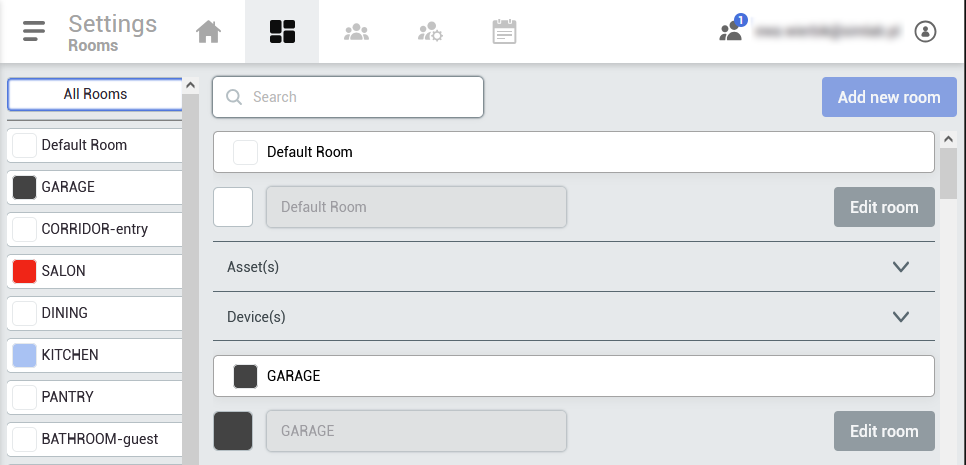
Rooms
By clicking on one of the existing rooms on the list on the left you can isolate it to see details about this one selected room only
|
 |
|
|
Users
In the User tab you can manage the users in your space, edit their roles, remove them from the project or add new users.
|
 |
Keep in mind, that the access to the Users tab requires appropriate permissions
Role Templates
In the Role templates tab you can add or change role permissions.
|
|
There are a few tabs that you can change privileges in: General privileges, Rooms, Devices, Assets, Scenes, Tickets. |


 |
 |
You can create multiple roles with different privileges depending on who you share the project with. If you want to share it with subcontractors, you may want to give them roles to edit assets or devices. If you want, you may want to give separate roles to plumbers, electricians, people controlling the project, your closest associates, etc.
If you set some general privileges (eg. to create rooms), the privileges on the other categories will change too.

In the example above, the Designer has some privileges to manage Interior Designer, Create tickets and view providers. Automatically some of the privileges was created as you can see in the image below, but you can revoke the access to specific rooms, devices or other options (in this example the Designer role allows to manage the Interior editor, create tickets and view providers excluding TURQUOISE, GREEN and PINK rooms).

Keep in mind, that the access to the Role templates tab requires appropriate permissions
Activity log
In the Activity log tab you will find the latest activity in the project and its type, time and the user it was triggered by.
|
 |
Interior Editor
In the Interior Editor model browser you can find 3D models, grouped by a few categories. It's a great tool for organizing and planning purchases, renovations, and interior design projects.
You can find it from the main side menu by selecting ![]() option.
option.
|
After entering the Interior editor, the Model browser will be automatically opened. You can close it at any time, simply click the arrow
If you decide to reveal it later on, you can do this by clicking the armchair
|
|
 |
Model Browser
|
 |

Uploading custom models
Adding your own models to the Interior Designer is now possible. To do so, proceed with the "+ Add New Model" then follow the instructions from the new window:
Supported 3D formats are:
Supported 2D (thumbnail) images are:
The newly added models will appear under "My Models" section in the Model Browser.
Before uploading your first model, we advise you to read our Best Practices in 3D Graphics page |
 |
Layout
|
In the Layout manager window you can see the list with all the 3D models added to the project and manage different model sets, called layouts, to set up multiple variations of spaces to preview.
Access the Layout Manager by clicking layered
To close the layout manager window, click arrow |
|

|
The uppermost tab of the layout manager is for grouping the models into “layouts”.
|
|


- Search
After adding 3D models to the scene, you can search for the desired model in the current layout by typing its name in this text field. - Model List
A list with all the models added to the currently selected layout. - Model Actions
You can click on the pinicon to see where the object is placed, change visibility of the model by clicking the view
icon or delete the model by clicking the bin
icon.
- Layout Actions
Further layout actions can be accessed by revealing the optionstab. There you are able to clone the currently selected layout, rename it or delete it.
- Layout toggles
To access the toggles, simply click the settings icon. You can toggle the visibility of layout model sets and choose the default one to be displayed.
Account
A roll-out panel where you can access other account-specific options
Subscription Plans
Central panel for License management, displaying all of the necessary information and plan details together with the history of payments, all in one, easily accessible space.

- Current plan
In this section you’ll see your current plan and it's features. - Invoice address
The specified information for payments will be displayed here. Select the edit icon to open a text window where you will be able to edit the information.
 - Settlements and payments
The upcoming transactions will be displayed here. - Plan details
Section displaying your current plans limits and their usage by space. - Promo codes
If you have a promo code, here’s where you can apply it. - Invoice history
The history of your account payments together with Invoice numbers, dates, plan names and costs. - Check plans
You can check all the plans here or by clicking on the image below.

The price of the product may vary depending on the user's location and the time of purchase. Please check the final price before completing your purchase
Preferences
A place to adjust language, units, electricity and other miscellaneous options.

- Error handling
Few toggleable options for the power user - Language
Available localisations: English, Spanish, Japanese, Polish, German - Temperature
Celsius, Fahrenheit, Kelvin - Power
kWh, Joule - Electricity price conversion
Toggleable option for automatic power price conversion
SIMLAB Cloud
Your main profile view where you can change your password/name and access the SIMLAB apps from.
SIMLAB Cloud is a comprehensive digital platform designed to support the entire lifecycle of building management through its Digital Twin solutions. It integrates advanced technologies such as Internet of Things (IoT), and 3D visualization to create a digital replica of physical assets, like houses, hospitals, factories. This digital ecosystem allows users to manage every aspect of a property from design and construction to maintenance or renovation.

You can select one of two solutions:
- SIM-ON: A versatile platform that leverages the Matterport scans to create a dynamic 3D visual interface. It integrates seamlessly with IoT and building automation systems like Fibaro, NETX, Samsung SmartThings and KNX, allowing for effective asset management and facility maintenance.
-
STAGES: Another solution under SIMLAB Cloud, STAGES focuses on monitoring the construction process and facilitates communication among teams and stakeholders. It offers tools for comparing different phases of a project using Matterport scans, 3d models, which helps in managing changes and maintaining a historical record of the building's state using the timeline.